Services and Resources
Our studio is no longer available due to MacLeod renovation.
We do still have equipment to lend.
We assist with video production to help deliver your content in an engaging manner. UBC offers free software and resources that let you easily create screencasts, narrated PowerPoints and whiteboard animations.
To learn more about these services, please select one of the following or contact us at learning@apsc.ubc.ca for any inquiries regarding these services.
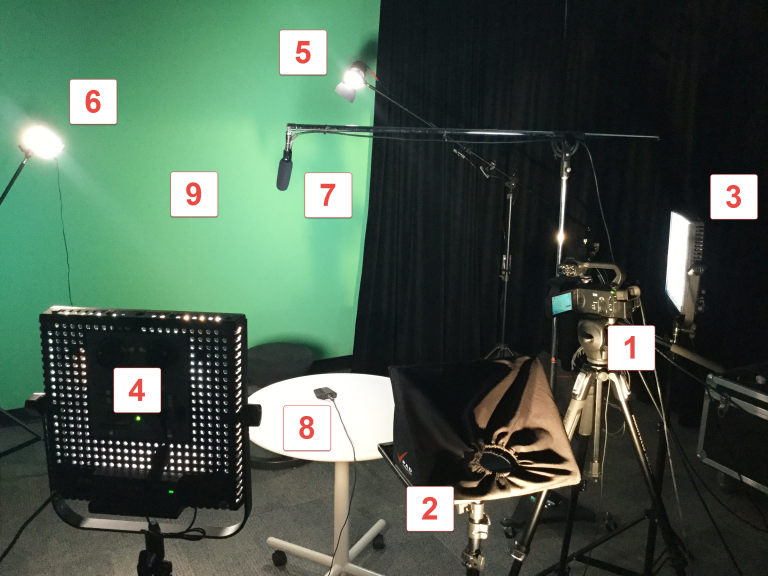
- Camera and Tripod Canon XA20 HD camcorder that records mp4 direct to SD card, with both microphones automatically mixed at camera
- Teleprompter – iPad powered teleprompter with voice activated scrolling
- Key Light – Litepanel bi-colour 1×1 – dimmable, colour temperature adjustable
- Fill Light – Litepanel daylight 1×1 – dimmable
- Back Light – Litepanels Sola 4 Fresnel Light – dimmable, focusable
- Kicker Light – Litepanels Croma – dimmable, colour temperature adjustable
- Boom/Shotgun Microphone
- Boundary Room Microphone
- Green Screen and Black Curtain backdrops
- TV monitor (not in picture)
We also have a camera, tripod, and lapel microphone available for filming outside of the studio. We are able to film lectures with this equipment upon request. If you are a faculty member interested in borrowing this equipment, contact us today.
Our studio is located in MCLD 219 and is free to use for all Applied Science Faculty. The studio is also available to other campus user when space permits. Contact us at learning@apsc.ubc.ca to inquire about booking the studio. The studio is not one-button, but it extremely easy to use and our students can help you!Try not to wear clothing that has busy patterns. Avoid checks, herringbone, stripes and pinstripe especially. Solid primary colours are best (but avoid green). If you have long or fuzzy hair, subtracting the green screen can be difficult and lead to poor results. In these cases, we recommend using the solid black backdrop.Bring an SD card and you can take the video home with you.
APSC CIS Video Studio Booking
Recording Remotely:
- Zoom: UBC Zoom Account w/ Zoom installed (can be requested from av.helpdesk@ubc.ca)
- Camtasia: Camtasia installed (can be downloaded from UBC Software Distribution Centre)
Recording in-Person:
- Find a bookable learning space with "Media Capture" availabilities (Search for "Media Capture" under Amenities)
- Drop-in Recording Kit* without Lectern PC: Personal Laptop / Computer, Intel NUC Computer, USB Camera (w/ tripod + USB cable), Wireless Lapel Microphone (w/ USB receiver), HDMI to USB Capture Card, HDMI to USB Cable, USB Busy Light, Power Cable, HDMI to HDMI Cable
- Drop-in Recording Kit* with Lectern PC: USB Auto-tracking Camera (w/ tripod + USB cable), Wireless Lapel Microphone (w/ USB receiver to plug into PC)
- Panopto Remote Recording Software
More information regarding in-person lecture recording can also be found here on the UBC Learning Spaces site.
*Recording Kit assigned to lecture schedule
Here are some tips to ensure the best results for lecture recording.
- During a Q&A, please repeat the question to ensure it is recorded in the video playback.
- You may need to wear two mics to use both the room's speakers and our wireless mic for recording.
- If you are in the Faculty of Applied Science, you should first contact the Centre for Instructional Support with your Canvasä You can contact us at learning@apsc.ubc.ca or drop into our office (CEME 1214) during normal business hours. Submitting requests to the email will automatically generate a help ticket in our system and helpful Learning Tech Rover will follow-up with you.
- Outside of normal business hours and for more difficult issues you can contact the central campus Learning Technology Hub [lt.hub@ubc.ca or 604-827-4775]
- To learn more about how to use Camtasia, you can browse the resources below.
Tip Set 1: Recording
When you record a video in Camtasia, noting these tips ahead of time will help you produce a better product:
1. Recording dimensions
- Record the screen in a larger size possible. By doing this, the quality of the your video will be retained when you upload to video server such as Kaltura, Cousera and YouTube.
- On tutorial on how to edit the video dimension of your recording, read or watch the tutorial by Techsmith for Mac and Windows.
2. Recording speed
- Talk slowly when you record the screencast. So that during the post-production, it will be easier for you to edit your voice.
- You do not have to re-take if you make a mistake during the recording. You can just pause for 10 seconds, correct your mistake and continue with the recordings. You will be able to edit out your mistakes in the post production process.
3. Recording "manageable chunks"

Instead of trying to record your entire powerpoint presentation in one attempt using Camtasia (which is virtually impossible as we all know and will take many attempts!), try recording one slide at a time. Each slide becomes an 'entity' all on its' own. You can then 'stitch' them together in Camtasia.
Lastly, you can insert a wrapper chunk(s) anywhere in your timeline. Wrappers can include:
- Guiding questions for students to consider when watching your video
- a self-assessment to take follow the conclusion of the video
- resources to extend learning further
- an opportunity to discuss or work with the content in some way (this may be your in-class activity)
Note: After you record your 'chunks' (i.e. slides), make sure you rename them accordingly (see image at right). This renaming will help you position the correct 'chunks' together on the timeline.
4. Record audio first, then drag other media onto timeline
Again, instead of trying to record your audio/video (i.e. tour of a webpage) together in one attempt using Camtasia, record your audio FIRST and save it. This way, the audio will have its' own timeline, separate from the video (and other media). Next, you can drag different media onto the timeline to align with your audio.
'
Note: Remember to adjust the setting to 'screen off", then hit the red record button to record just the audio.
5. Recording a powerpoint
When you record a PowerPoint lecture, keep the following tips in mind:
- Use a PowerPoint add-in. (Only available in Camtasia Studio 8) The PowerPoint add-in toolbar lets you record your PowerPoint easily. Watch this video by TechSmith: Record a PowerPoint Presentation
- Recording a PowerPoint in a widescreen: by default, your PowerPoint slides will have an aspect ratio of 4:3. When you record slides like that in Camtasia, and upload them to YouTube, you might see black bars on the sides of the video. To prevent this, you'll need to change your PowerPoint slides' aspect ratio to 16:9.
Changing the aspect ratio of PowerPoint slides on Windows
- Click on the Design tab, and select Slide Size.
- Click Widescreen (16:9)
Changing the aspect ratio of the PowerPoint slides on Mac
Watch this video by Techsmith: Record a PowerPoint or Keynote Presentation.
The video has best practices and tips for recording PowerPoint presentations.
- In Microsoft PowerPoint, open the PowerPoint file that you want to change the aspect ratio of.
- Go to File>Page Setup
- Beside Slides sized for, select On-Screen Show (16:9) from the drop-down menu. Then press OK.
Tip Set 3: Exporting
Camtasia's Interactive Functionality
Camtasia has Interactive Functionality to add quiz or interactive component and export as a SCORM . However, unfortunately by default, the quiz data will be sent to TechSmith server, Therefore, in order to be FIPPA compliant, avoid using the quiz/interactive functionality.
As an alternative, you can upload the video to Kaltura, and use the Kaltura quizzing function.
Tips to achieve the best quality
In most cases, you will be uploading a video to a video server(s). Such as YouTube and Kaltura. In order to achieve the best quality, check the video specification(or recommendation) for the video server that you are going to upload the video to. Then, adjust the export setting so that it matches with the video specification. See the list below to check the video specification for major video servers at UBC .
Video Specification for:
Kaltura
Sometimes when you export a video in Camtasia and upload it to Kaltura, the video quality is not as good as what you have expected.
The reasons are because:
- By default, Camtasia will export video with variable video bitrate(data size of the video) so that it will allow Camtasia to export videos in lower file size with a decent video quality. However Kaltura interpret the video as low quality if the video bitrate is not high enough. This is why your video will look blurry on Kaltura even though your original video file is in a decent quality.
- On Kaltura, there are only 3 transcoding options which are: HD720p(high quality), SD540p(medium quality) and SD 360p(low quality). This means, if you upload a video with a lower-medium quality (which can be around 480p), then once you upload the video to Kaltura, the video will be degraded to SD 360p (Low quality).
The workaround for this is to export camtasia video file in higher bitrate so that the video file will be interpreted as HD720p Quality video in Kaltura. This documentation will show you how to export camtasia file into HD (High Definition) quality using Camtasia 2 (Mac version) and Camtasia Studio 8(Windows Version)
How to export a HD quality video in Camtasia 2 (Mac version)
The video above is a short sample video exported in HD quality. Follow the steps below to export Camtasia video in HD Quality:
Step1: Setting the canvas size

- Select the Canvas Zoom drop down
- Select Adjust Canvas. Beside the Preset, select YouTube HD 720p.
- Press Apply.
- Adjust the screen size.
You can follow the above steps by watching the screencast by Techsmith on: 4: Editing essentials: What You Really Need to Know
Step2: Export
- Click on Share, which is located on the top menu bar.
- Go to Advance Export
- Select Export to MP4, and click on Options
- Select the Image Size as 1280X720 HD
- Click Ok, and press Export.
How to export a HD quality video in Camtasia Studio 8 (Windows version)
The video above is a short sample video that is exported in HD quality using Camtasia Studio 8 (Windows).
Follow the steps below to export a video in HD Quality:
Step1: Setting the Canvas size
- Click on the Canvas Size option above the preview.
- set the width to 1280 and the height to 720.
- Adjust the screen size.

You can follow the above step by watching the Screencast by TechSmith: 04: Editing Dimensions and Saving
Step2: Export
- Click on File, and press Produce and Share.
- Select Add/Edit Preset. Then press New. You may set your preset name. (For Example: HD quality video)
- Under File Format, Select MP4- Flash/HTML 5 player.
- Select the Size tab. Under Video size, check Use editing dimensions
- Select the Video Setting tab. Set the Frame Rate to 30. Set the Encoding mode as Quality, then set the quality to more than 65%
- Click Next, and then select Finish.
- Select the Production Preset that you have just created (For Example: HD quality video)
- Press Next, and then click Finish.
VideoScribe is an animation software that allows instructors to create animation videos on a virtual whiteboard. Instructors can choose from an extensive library of shapes, images and text fonts, customize the animations, and add voiceovers and soundtracks.
VideoScribe Sample:
- If you are in the Faculty of Applied Science, you should first contact the Centre for Instructional Support with your Canvasä You can contact us at learning@apsc.ubc.ca or drop into our office (CEME 1214) during normal business hours. Submitting requests to the email will automatically generate a help ticket in our system and helpful Learning Tech Rover will follow-up with you.
- Outside of normal business hours and for more difficult issues you can contact the central campus Learning Technology Hub [lt.hub@ubc.ca or 604-827-4775] and members in the Do-It-Yourself (DIY) Media Learning Community and industry experts from UBC Studios. Additional expertise is available during regular DIY help sessions.
- To learn more about how to use VideoScribe, you can browse the resources below.