Getting Started

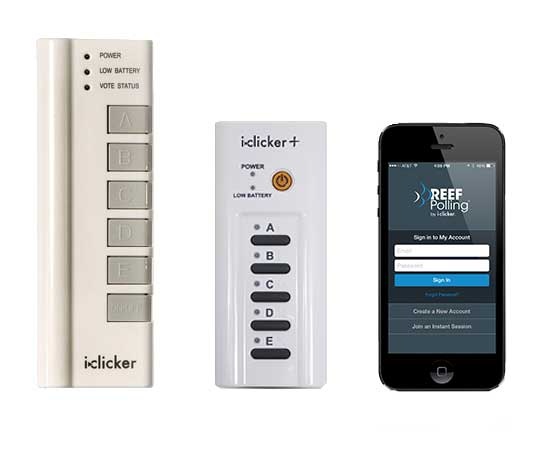
Clickers (or Student Response Systems) are wireless handheld devices that allow students to respond to classroom polls and quizzes. The clickers transmit student responses to the instructor's computer where they are recorded and then the instructor can choose to share these results directly back to the class.

The Centre for Instructional Support can provide instructors with test clicker and a portable base station so they become familiar with the iClicker system/software in their office before using them in class.

Students need to register their clicker ID through a link in your Canvas course. This registration process connects each clickers ID and results with the appropriate student number so the grades can be synced into the Canvas grade book.

Studies conducted on the usage of clickers demonstrate an improved learning environment for students. Effective use of clickers leads to greater class interactivity, increased student-teacher interaction, and consequently improved conceptual understanding of material for the learners.

Instructors can use clickers as a tool to gauge students' understanding and/or as a low-stakes quiz delivery system.

Clickers also allow instructors to:

  • Increase class participation and improve attendance
  • Spark debate and discussion in class
  • Identify students who need additional assistance
  • Instantly gauge student comprehension of a particular topic or question
  • Take attendance
  • Encourage class discussion among all students
  • Instantly grade and record student results
  • Give continuous feedback to provide students an active learning process
  • Generate student assessment reports
  • Easily deliver quizzes and assessments electronically
  • Focus more time on teaching and less time on paperwork and grading

Get Started with Clickers

Software Download

To use Clickers with Canvas, you will need to download the iClicker Classic software onto your computer. You can do so here:

If you're running the Mac OS Sierra, please refer to this guide to setting up on a Mac. iClicker software is available for both Windows and Mac.

Download Instructions

  1. Access the software distribution site at the link above and sign in with your CWL.
  2. Select "iClicker Classic" from the Teaching & Learning tab.
  3. Click "Add to Cart", then "Check Out".
  4. Follow the prompts until you reach an Order Summary screen with a download link.

If you need to download a copy of iClicker and do not have/need to get a CWL, you can download it directly from the iClicker Website (note: downloading iClicker this way does not allow for synchronization with Canvas), or contact support for more help.

Pickup the Blue Instructor Remote

Used to remotely start/stop polling, show/hide results, set correct answers, and advance slideshow presentations.
Instructions for changing the frequency can be found on the back of every remote.
Stop by for a quick demo and/or pick up your UBC iClicker instructor remote at the LT Hub (Room 2.27 in the Ike Barber Learning Center). You can also schedule a time by contacting clicker.support@ubc.ca, or contact your local Instructional Support Unit for more information.

Set up your classroom

USB Switcher Device

Your classroom will need a receiver base station to receive and process student votes. Check to see if your room already has a clicker base installed (see list of rooms for Vancouver or Okanagan). If it is not equipped:

  • Get your classroom equipped. An iClicker receiver base can be installed for you (as long as the room has a podium to lock the iClicker receiver base in). Contact clicker.support@ubc.ca to have one installed.
  • If a base cannot be installed, use a portable iClicker receiver base. CTLT will loan you a portable base that can be used in any room. Check the list of rooms to see which frequency you can use.

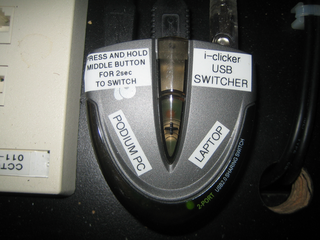
The iClicker receiver base can be connected via USB to a laptop or podium computer. The USB port for your flash drive can be found on the right side of the iClicker base receiver. If using a fixed classroom base, the iClicker USB switcher near the podium (see picture) has to be set to the right input in order for the receiver to function. The location of the switcher may vary depending on the design of the podium. Make sure the switcher is set to the right input determined by your choice between laptop or podium computer. To switch the input, press and hold the button on the switcher for two seconds.

  • Click here for more details about connecting the hardware.

Running an iclicker Session

If you're looking for sample clicker questions, the Carl Wieman Science Education Initiative (CWSEI) has links to some helpful resources.

  1. Before starting a session in class, plug in the iclicker receiver hub. Ask your students to turn on their clickers and if needed, change their frequencies.
  2. In your clicker folder, open the iclicker application.
  3. Select your course.
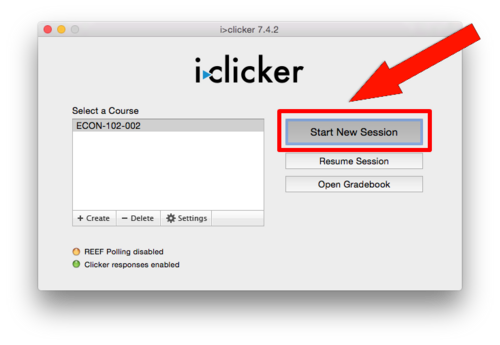
  4. Choose "Start New Session":
    Start iclicker Session.png
  5. A toolbar will pop up in the top left corner of your screen. It will float over top of PowerPoint and other presentation media. If you can only see the toolbar on the podium's or your laptop's screen, but not on the classroom overhead, please refer to Projector Screen for instruction. Click the "Multiple Choice" button on the toolbar when you ask your students a question. Click "Multiple Choice" again to stop polling your students. If you are using a blue instructor remote, the "A" button can be used to start and stop polling.
    Iclicker Timer.png
  6. A timer will appear and will count up. A counter shows the number of student votes received for the question.
  7. Click the bar graph icon at any time during your session to show a bar graph of responses with percentages and number of votes for each choice. If you are using a blue instructor remote, the "B" button can be used to display the results. Click the icon or "B" again to hide the graph.
  8. If you want to show the correct answer after the question, you can click on the correct answer on the display graph.
  9. Click the "x" button on the top left corner of the toolbar to close iclicker when you are done your session.

Clicker Software Update

To make sure you are running the newest version of the software, you can run the automatic update check by following these steps:
  1. Open the iClicker application
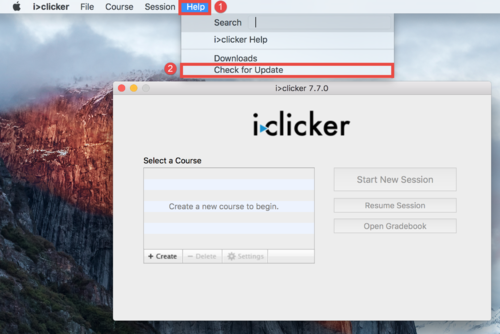
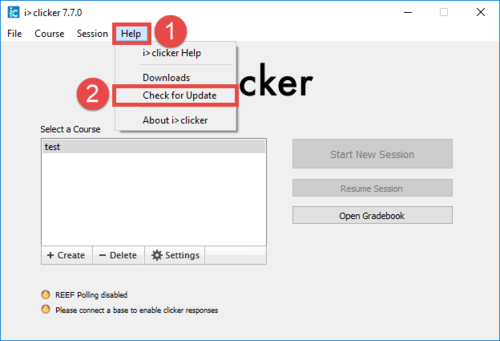
  2. Go to "Help" to select "Check for Update" (For Mac users: look in the top left menu bar.)
  3. If there is an available update, click "Update" to run it automatically.
Clikcer Software Update
Mac User
Windows User
Note: You will not lose any existing data or configuration by running the automatic update. You can delete the "Archive" folder that contains the older software afterwards.

REEF

UBC now provides support for REEF (formerly i>clicker GO), a web-based solution that allows students to use their mobile device to answer regular clicker questions.
REEF also has the ability to work alongside the iClicker remotes, so instructors can start a polling with students using either REEF or the physical iClickers.
Instructors can:

  • enable REEF on iclicker version 7.4.2 or newer by following these instructions. You can find the version number on top of the iClicker window after you open the application.
  • use the web based REEF Education software by following these instructions. This requires all of your students to have a REEF account.

Notify the UBC Bookstore

Place an order with UBC Bookstore if you intend to use clickers in your course to ensure adequate stock for your students.

Loan Kits for Events

The LT Hub has clickers on hand to loan out for events. If you have a training session or would like to use clickers for a bigger event, please fill out this form: Learning Tool Setup Request Form, and select iClicker Hardware Request under Service Requests and follow the prompts. Currently, we can loan out ~200 clickers at a time at most (subject to availability).

If you are new to using iClickers, we can attend your first class using clickers and make sure things start smoothly and without stress.
Contact jim.sibley@ubc.ca to arrange a classroom visit.


Common Requests

  • If you are in the Faculty of Applied Science, you should first contact the Centre for Instructional Support with your Canvasä You can contact us at learning@apsc.ubc.ca or drop into our office (CEME 1214) during normal business hours. Submitting requests to the email will automatically generate a help ticket in our system and helpful Learning Tech Rover will follow-up with you.
  • Outside of normal business hours and for more difficult issues you can contact the central campus Learning Technology Hub [lt.hub@ubc.ca or 604-827-4775]
  • For issues with iClicker base stations inside classrooms, you can contact UBC Learning Spaces.
  • To learn more about how to use the iClicker on your own, you can check out the iClicker documentation.

We provide the following training and services to faculty members and staff:

  • Hands-on Training: Drop-by our office or we can visit you onsite.
    • Best practices to use iClickers effectively as learning tools.
    • Laying out questions in an accessible format.
    • Integrating iClicker with Canvas.
    • Allowing students to vote with their phones (REEF Polling).
  • Equipment: We provide the needed tools to faculty members.
    • iClicker remotes and Instructor bases.
    • USB drive loaded with iClicker software.
  • Processing Grades: Send us your files and we can upload the results.
    • Ensuring student numbers are matched with remote IDs.
    • Uploading the grades into the grade-book.
What is REEF?

REEF (formerly i>clicker GO) allows students to answer regular clicker questions using their handheld device or laptop. Upon purchasing an access code, students can log in with a mobile app or in their browser and respond to the same questions as students using physical iClicker remotes.
REEF allows students to review session contents and their answers as a study guide after class.
Instructors can use REEF through either the iClicker 7 software or the REEF Education software.

Instructors

Thinking of using REEF in your course?
REEF is a web-based solution that allows students to use their mobile device to answer regular clicker questions. it also has the ability to work alongside the iClicker remotes, so instructors can start a polling with students using either REEF or the physical iClickers.
There are several things that you may want to consider before you start using REEF.

  • Students will need to purchase a registration code.
  • Instructors can either use iClicker 7 with REEF Polling enabled or use REEF Education software on its own.
  • REEF requires internet connection in your classroom. Check your room to make sure you have a stable internet connection.
  • REEF is marginally slower than the regular clicker software in collecting physical remote responses.

Contact clicker.support@ubc.ca if you have any questions regarding REEF.

iClicker 7 - REEF Polling option

Download the appropriate version of the clicker software. iClicker version 7.4.2 or newer is required to use REEF Polling.

Enable REEF Polling in iClicker

1. Open the iClicker application in the clicker folder and create a new course
2. Select the course and click "Settings"
3. Set up your course in iClicker for use with Canvas
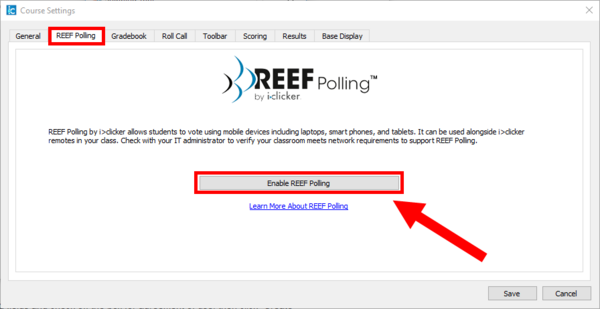
4. Under the "REEF Polling" tab click the "Enable REEF Polling" button at the bottom

Enable REEF Polling

5. Log in with your REEF Polling account or click on "Create Account" to create a new one

  • You can also log in with your i>clicker GO account if you have used i>clicker GO previously
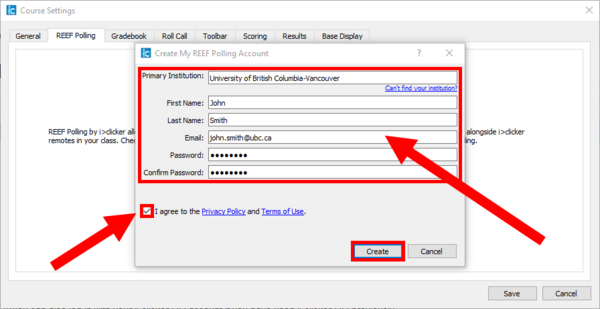
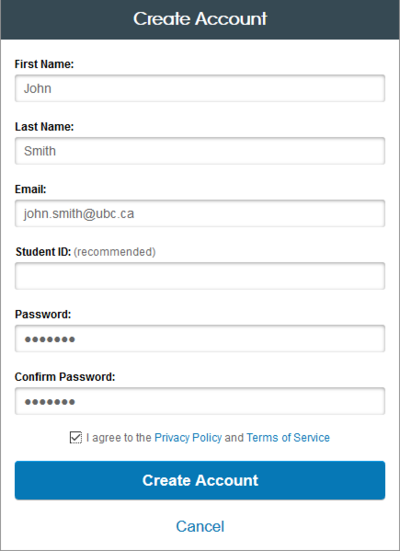
  • To create an account, fill in all the required fields and check off the box for agreement of use, then click "Create"
  • Make sure to type in the full name "University of British Columbia" for "Primary Institution" and select your campus.

Create a REEF account

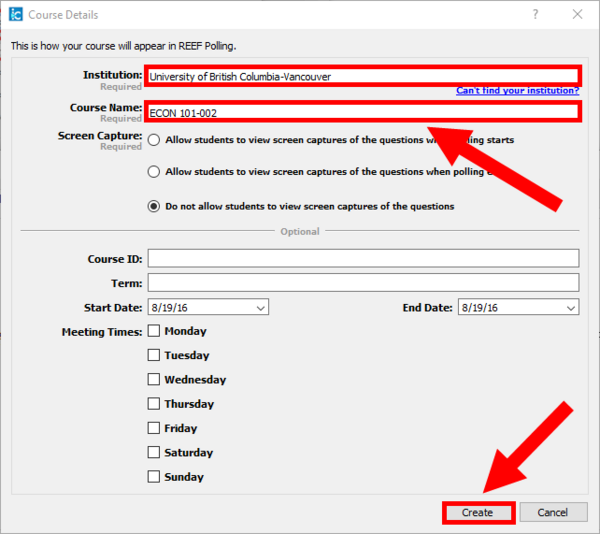
6. After you have logged in, fill in the required "Course Details", type in "University of British Columbia" for institution and select your campus. Change the Start and End dates accordingly

  • Note: if you want to allow your students to use the questions as a study guide after class, select either the first or second option for Screen Capture

Create a REEF course

7. Click “Create” then click “Save”. Students can now use REEF Polling to vote in your class.
  • Note: You must have an internet connection to use REEF Polling in your course. You will not be able to start polling unless you are connected to the internet.

Importing the REEF Polling roster in Gradebook

Follow these instructions to download the course roster with REEF Polling registrations included:

1. First import your class roster normally with the Gradebook. This will import your roster without REEF Polling registrations added
2. Make sure your REEF Polling option is enabled. See these instructions to set it up
3. Start a polling in class. Students can vote with i>clicker remote or REEF Polling
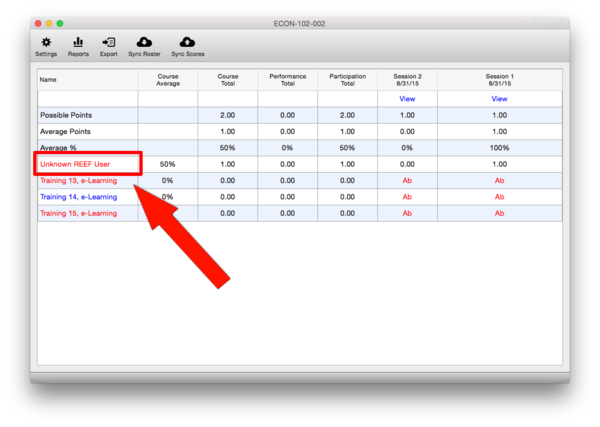
4. Open Gradebook, you will see that you have received votes from "Unknown REEF User"

Unknown REEF User

5. To import REEF Polling information, click "Sync Roster"
6. Gradebook will automatically import REEF Polling data. The Sync Roster window will pop up indicating a successful download.
  • Make sure you have an internet connection when polling in a REEF Polling enabled course. Without internet, you will not be able to collect REEF Polling responses. Students using REEF Polling will not be able to connect to your polling session.

REEF Education

Please see this page for information on REEF Education.

Students

Your instructor must set up REEF Polling for you to use it. Check with your instructor about whether they allow REEF Polling before you purchase a subscription.

Thinking of using REEF Polling?

Pros

  • Any device with an internet connection can be used to answer regular clicker questions. This includes smartphones, laptops, and tablets
  • There is an app for both iOS and Android users. Other devices can access REEF Polling through a web browser
  • Eliminates the need to bring a physical clicker to class
  • Free two week trial available - if you've forgotten your existing clicker, try this out as a temporary replacement
  • Review questions after class to use as a study guide

Cons

  • Your device must have a stable internet connection to use REEF Polling
  • Battery life of your device will be shorter than that of a regular clicker
  • You can't re-sell or share REEF Polling like you can with a physical clicker remote
  • REEF Polling takes a little more time to send a vote than a regular clicker. The delay is about one or two seconds, so be sure to factor this in if you frequently vote at the last moment.

Registering for REEF

  1. Make sure your instructor is using REEF in their course! REEF will not work unless your instructor has set it up.
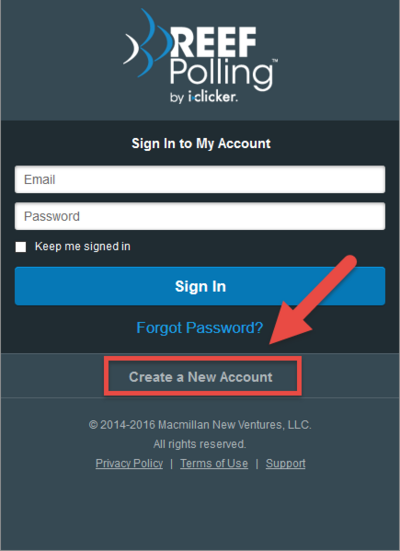
  2. You can register through the app or online in a web browser. Upon registration, you will be given a 14 days free trial before you need to buy subscription. To register online, click the "Create a New Account" link found here
  3. Click "Create a New Account" to create a REEF Polling account
  4. Fill in all fields. Make sure that you enter your UBC student number for the Student ID field if your instructor is using the iClicker 7 software with REEF

Create Student REEF Polling Account 1
Create Student REEF Polling Account 2

Note: If your instructor is using the REEF Education software, refer to this page to link your REEF account with Canvas.

DO NOT USE REEF Polling AND YOUR ICLICKER FOR THE SAME QUESTION. If you answer the same question with both your physical clicker and your REEF account, you may not receive grades for your response.

Using REEF Polling

  1. In class, use the REEF Polling app on your mobile phone or log in with your laptop at https://app.reef-education.com/
  2. Click the + (plus symbol) on top right
  3. Fill in "University of British Columbia" to "Find Your Institution", then select your campus
  4. Fill in either your instructor's name or the course name
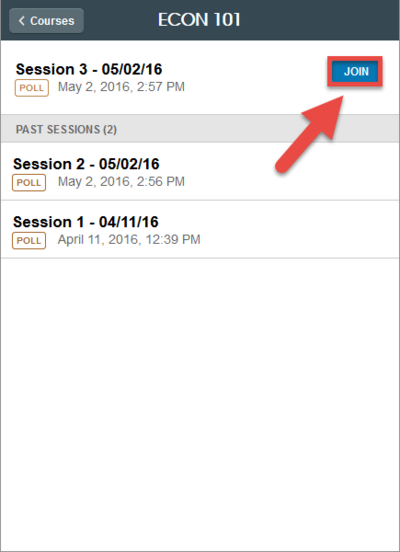
  5. Select "Add This Course" then select the course to join polling session

Join polling session

6. Select your answer after the instructor starts the polling. If allowed by your instructor, you can review the question after class

Script error: The function "navbox" does not exist.