Getting Started
WeBWork is an online testing platform developed by the Mathematical Association of America. It provides excellent tools to developed complex, equation-based online questions and deploys them within the Canvas system. There are online libraries of free WebWork problems (Math and Engineering).

WeBWorK is an online platform for delivering individualized homework problems. By giving students instant feedback, WeBWorK encourages students to make multiple attempts until they succeed. Cheating is discouraged as the problems are individualized. Instructors receive real-time statistics which helps customize lesson plans to better serve students.
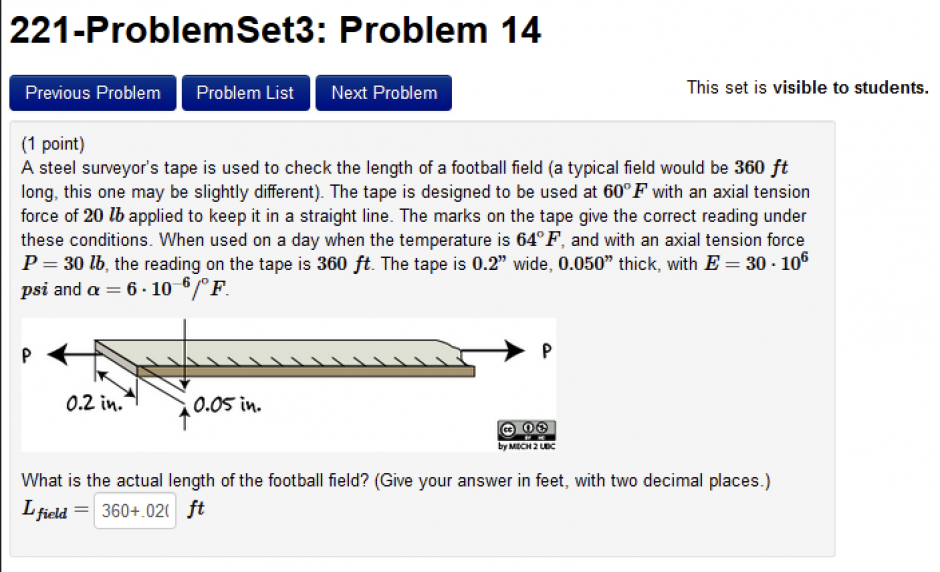

WeBWorK is a UBC supported web-based homework system which was developed at the University of Rochester in 1995. UBC's Math department first piloted WeBWorK in 2009, and has since been adopted by many more departments. The current instance is deployed in a high availability environment using UBC IT infrastructure, providing a reliable service to all faculties across UBC.
WeBWorK is primarily used in Math and Engineering at UBC. At UBC Engineering, a number of Electrical, Mechanical, and Chemical Engineering professors take advantage of the WeBWorK system. UBC Engineering has undertaken a multi-year project to build libraries of WeBWorK problems.
Contact jim.sibley@ubc.ca if you want to learn more from the current faculty users of the WeBWorK system.
Students can access WeBWorK through Canvas, which is required for the course roster and grades to sync.
You will want students to access WeBWorK through Canvas, at least for the first time they login to WeBWorK. Accessing the course this way automatically adds the student to your WeBWorK course and pushes the grades back to the Canvas gradebook. On subsequent visits, students can go directly to WeBWorK if they desire.
To create a link to WeBWorK through Canvas, go to "Assignments" and click on "External URL" in the drop-down menu for Submission Type. Click "Find" and then press the blue "Submit" button after you have selected "WeBWorK."
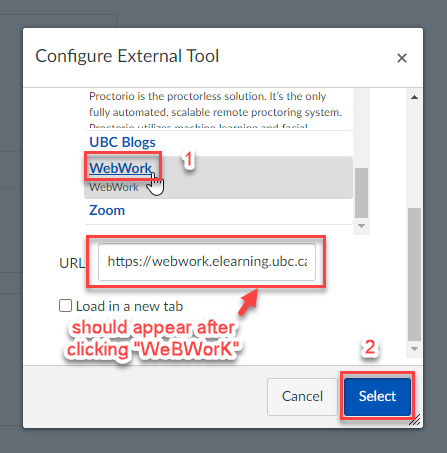
One of the easiest ways to navigate WeBWorK is to take advantage of a large bank of previous problems that are publicly available on GitHub or accessible through WeBWorK's Library Browser tool.
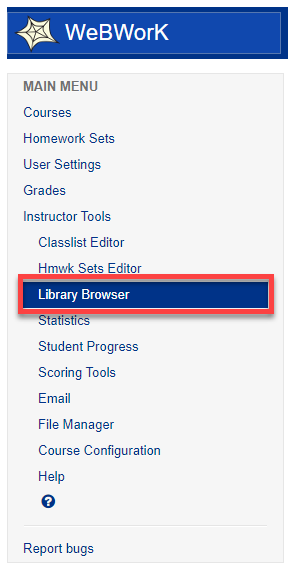
Once you have logged into WeBWorK, click on "Library Browser" in the left hand side column.
From there, problems can be added to a preexisting problem set, or to a newly created one. Select "Open Problem Library" and then make sure to select "UBC" in the subsequent row. More specific problems can be found by adding the subject, chapter, and section of problems you are looking for. Click on "View Problems" when you're ready.
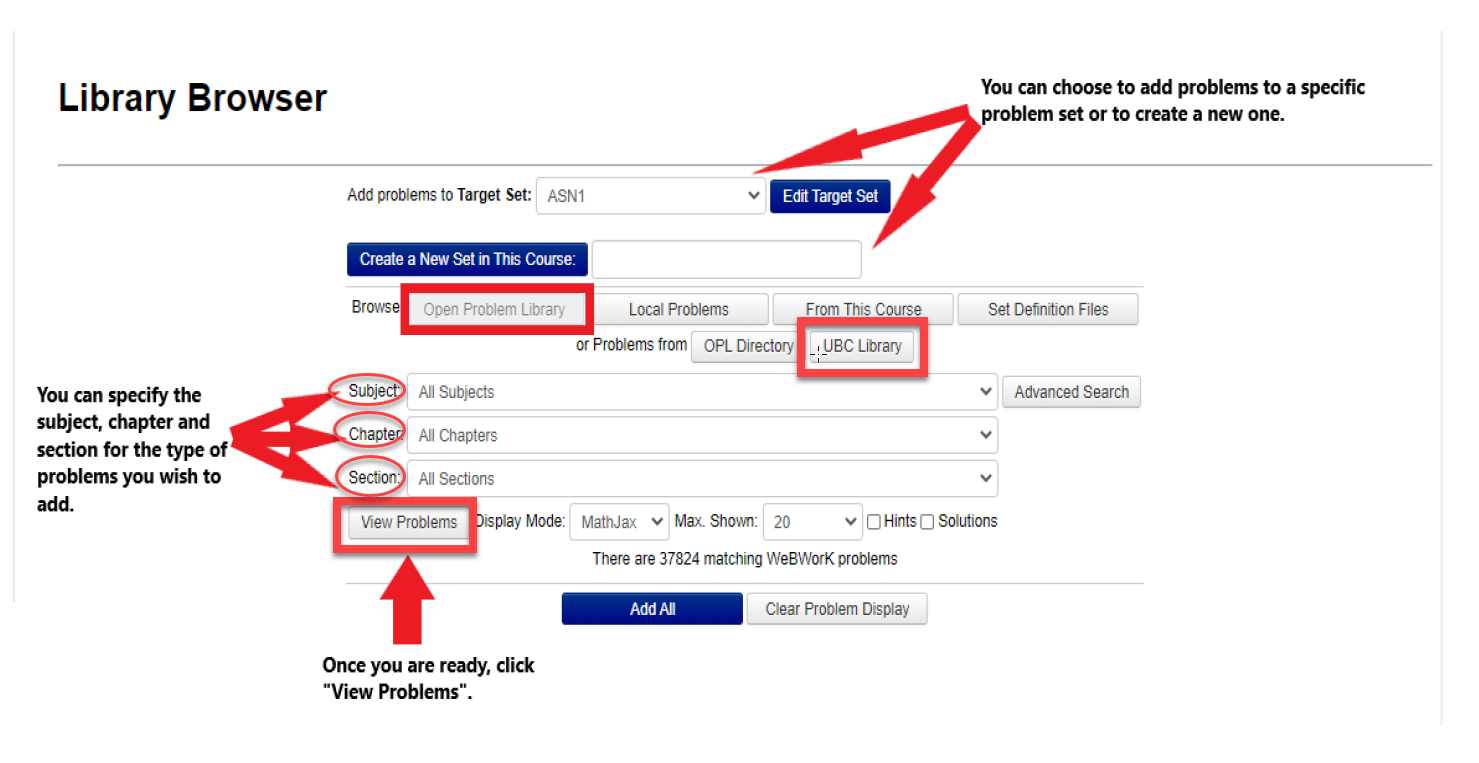
Once the problems appear below the "View Problems" button, you can choose to add problems individually, or add all the problems listed by clicking "Add All."
Check your Assignment in the "Hmwk Sets Editor" on the left hand column to see if the import was successful.
The process to copy files from the website is as follows.
- Go to the GitHub UBC folder.
- Open the PG file (which houses the text of the problem) of your choice.
- Check to see what image files are necessary for the problem. They will be denoted with an "@" in the line of code. If there are no image files present in the code (i.e. PNG, JPG, etc.), then skip to step 11.

- Go back to the outer folder, find the necessary image files, and click "Download."
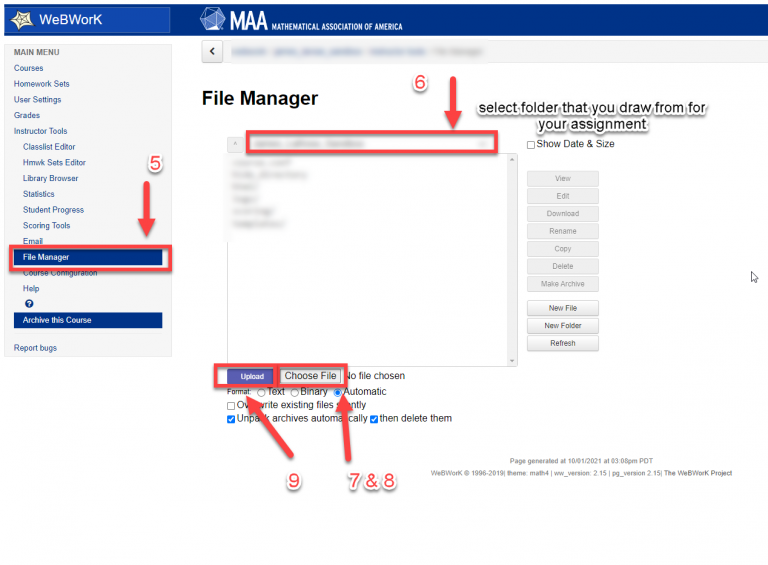
- Go to WeBWork. Click on the "File Manager" icon in the left hand column.
- Ensure you are importing to the correct course in the top drop-down menu.
- Click "Choose File" at the bottom of the page.
- Select an image file you downloaded from GitHub.
- Click "Upload."
- Repeat for all image files you downloaded.
- Go back to GitHub. Find the PG file you are interested in, and select & copy the entire contents.
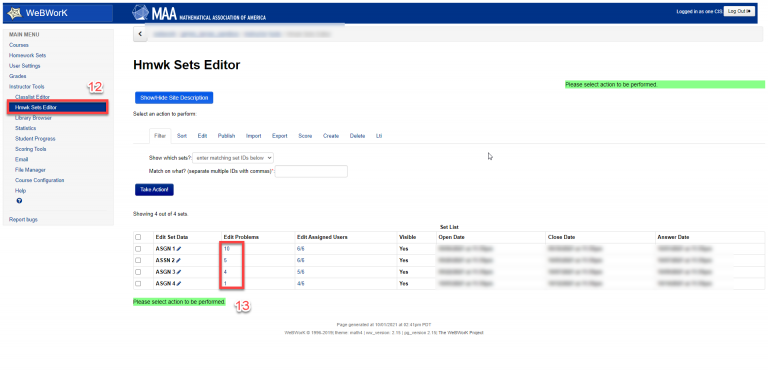
- Go back to WeBWork. Click on "Hmwk Sets Editor" in the left hand sidebar.
- Under the "Edit Problems" column, click on the row in which you would like to add your newly copied GitHub text.
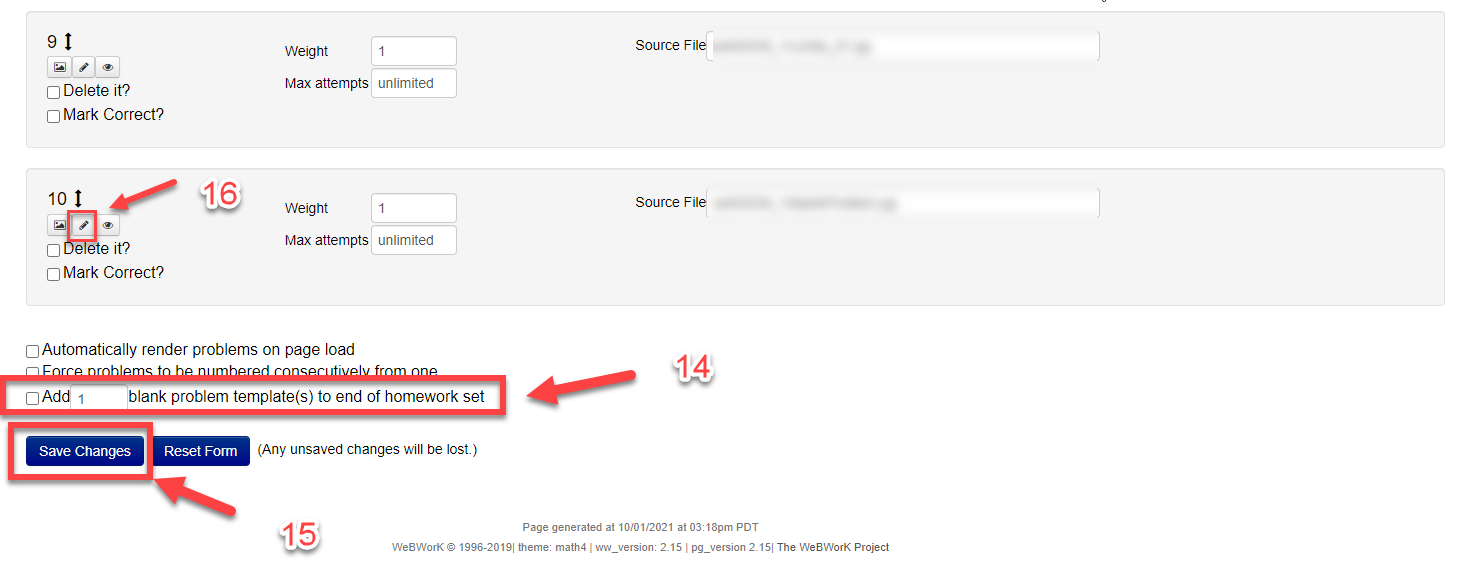
- At the bottom of the page, click on the check box that says "Add __ blank problem template(s) to the end of the homework set" and put the number "1" in the blank box.
- Click "Save Changes."
- In the new problem you just created, click on the "Edit" icon.
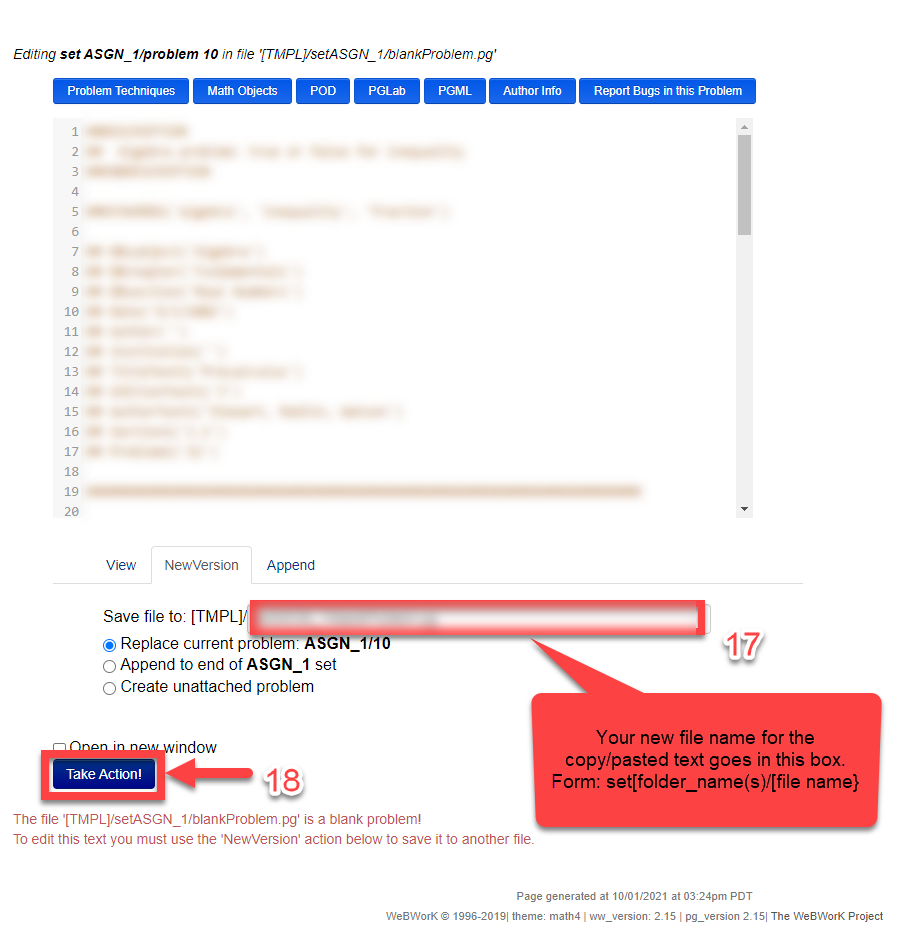
- Select all of the text and delete. Paste the new text that you copied earlier from GitHub's PG file.
- At the bottom of the page, click "NewVersion" and give your file a new name. Check to make sure it will be categorized in the corresponding correct folder, then click the blue "Take Action!" button to save your work. You're all done! Repeat the process for all problems you would like to duplicate from GitHub.
Sometimes, it's necessary to copy a Homework Set from one WeBWorK course to another (for example, re-using a collection of useful problems without needing to search for each problem again in the Open Problem Library).
To copy a Homework Set from one WeBWorK course to another, we must export set(s) from one course, and import them into another course.
Here are the steps to follow:
First, you will archive and download the Homework Set(s) from the first course:
- Go to the WeBWorK course with the content you want to copy from, and click on "Homework Sets Editor"
- Select "Export" and pick the sets you want to export (or select all) and click "Take Action!".
(The export function creates a "set definition file" (.def) for each selected Homework Set. Each .def file has a filename matching the name of the homework set, and contains the assignment name, dates, and references to the problems being used in the set. The .def files are saved in the templates directory of the course.) - Go to the File Manager
- Make sure the "templates" folder is listed, and select all .def file(s) you want to export.
- Click the "Make Archive" button on the right. A .tgz archive file will be created. You should see the new ".tgz" file listed below your .def file, using a similar file name. (A .tgz file is an archive, similar to a zip archive, that contains all the Homework Set definition files.)
- Download the .tgz file to your computer by selecting the .tgz file and clicking the "Download" button.
Next, you will upload the archive file into the second course, and unpack ("import") it into place:
- Go to your second WeBWorK course, and go to "File Manager".
- Click "Choose file", select the .tgz file from your computer, and click the "Upload" button. Now your archive is physically uploaded, but still needs to be unpacked and imported into the second course.
- To import your newly-uploaded .def file(s), go to "Homework Sets Editor", select the "Import" tab, select "Multiple Sets", and select the .def file(s) from the list, and click "Take Action".
- Edit the assignment due dates and homework sets as needed.
To use WeBWorK with Canvas, first create a link to WeBWorK inside your Canvas course and access WeBWorK via Canvas (Step 1). Then, for each unique WeBWorK assignment, create a unique Canvas assignment (Step 2).
Note: It is necessary that students access WeBWorK exclusively via Canvas in order for the course roster to populate in WeBWorK. Therefore by default, the WeBWorK course link is not on the course list on UBC’s WeBWorK homepage. Currently the WeBWorK course roster populates only as each student accesses WeBWorK via Canvas.
Add a link to WeBWorK via a Canvas Assignment (Step 1):
- Log in to your Canvas
- Select Assignments.
- Press the + Assignment
- Enter an Assignment Name such as "WeBWorK Link."
- Scroll down to Submission Type.
- Select External Toolfrom the drop-down menu.
- Next to Enter or find an External Tool URL, click Find. Note:If you skip this step and manually enter a URL without using the "Find" function, WeBWorK will not sync with Canvas.
- Select WeBWorK.
- Select "Load in a new tab." Note:If you skip this step then WeBWorK will not sync correctly with Canvas.
- Click Select.
- Save the Assignment. Note:In Step 1 it may reduce confusion if you "Save" rather than "Save & Publish."
- Click on "Load [Assignment Name] in a new window."
Create a Unique Canvas Assignment for each Unique WeBWorK Assignment (Step 2):
- Log in to your Canvas
- Select Assignments.
- Press the + Assignment
- Enter the Assignment Name.
- Scroll down to Submission Type.
- Select External Toolfrom the drop-down menu.
- Next to Enter or find an External Tool URL, click Find. Note:If you skip this step and manually enter a URL without using the "Find" function, WeBWorK will not sync with the Canvas Gradebook.
- Select WeBWorK.
- At the end of the WeBWorK URL (https://webwork.elearning.ubc.ca/webwork2/), add: ?custom_homework_set=homework set nameFor example, if your WeBWorK Homework Set is "Homework-01" then the full URL will be: https://webwork.elearning.ubc.ca/webwork2/?custom_homework_set=Homework-01 Note: If you are creating a WeBWorK Quiz replace ?custom_homework_set=homework set name with ?custom_quiz_set=quiz name. For example, if your WebWorK Quiz is "Quiz-01" then the full URL will be: https://webwork.elearning.ubc.ca/webwork2/?custom_quiz_set=Quiz-01
- Select "Load in a new tab." Note:If you skip this step then WeBWorK will not sync correctly with Canvas.
- Click Select.
- Save or Save & Publish the assignment. Note:The assignment must be published for students to see it.
Note: Currently each student must access each WeBWorK assignment exclusively through Canvas in order for the student to appear in WeBWorK and in order for grades to sync properly between WeBWorK and Canvas.
WeBWorK Instructor Guide - UBC LTHUB
What level learner is this workshop for?
Complete beginners with little to no previous Webwork experience.
What topics will the workshop cover?
- What WeBWorK is and why it is useful.
- How to create your own WeBWorK course and attach it to Canvas.
- The kinds of assessments offered by WeBWorK and how to create them.
- Problem creation outside of WeBWorK.
- Creating and editing a blank problem in your assessment.
- The basic syntax of PG language and the general template for all problems.
- Randomizing questions, variables, arrays, for and if statements, creating functions.
- Solutions, hints, tolerances.
- Uploading and displaying images in WeBWorK.
- Live demo showing coding of a simple example problem.
- How to connect WeBWorK to gradebook in Canvas.
Request for a Workshop.
Request a Workshop
Please fill out the form below to request a workshop.


